Connect your venue app
Approve a restaurant, booking or play venue app, choose the plan it shows, choose its sites, switch on Live 3D and disconnect it.
Updated · View as Markdown
Your venue app starts the connection, and you approve it in FloorPlanCraft. Once connected, the app can show your plan and send its live status to it.
Approve the connection
- Start the FloorPlanCraft connection in your venue app's settings. The app opens a FloorPlanCraft page: “Connect an app to FloorPlanCraft”.
- Check what the app says about itself: The app says it is (the venue name it sent), The app sent (how many tables or areas), Returns to (the app's address) and May show your plan on (the sites it wants to show the plan on).
- If you are signed out, enter your Email and Password and press Sign in to continue. New here? Press Create an account instead, then Create account and continue. Use the account that owns the plan; nothing is connected until you approve.
- Choose the Workspace, if you have more than one, and the Plan to show in the app.
- Press Approve and connect. Your browser goes back to the app.
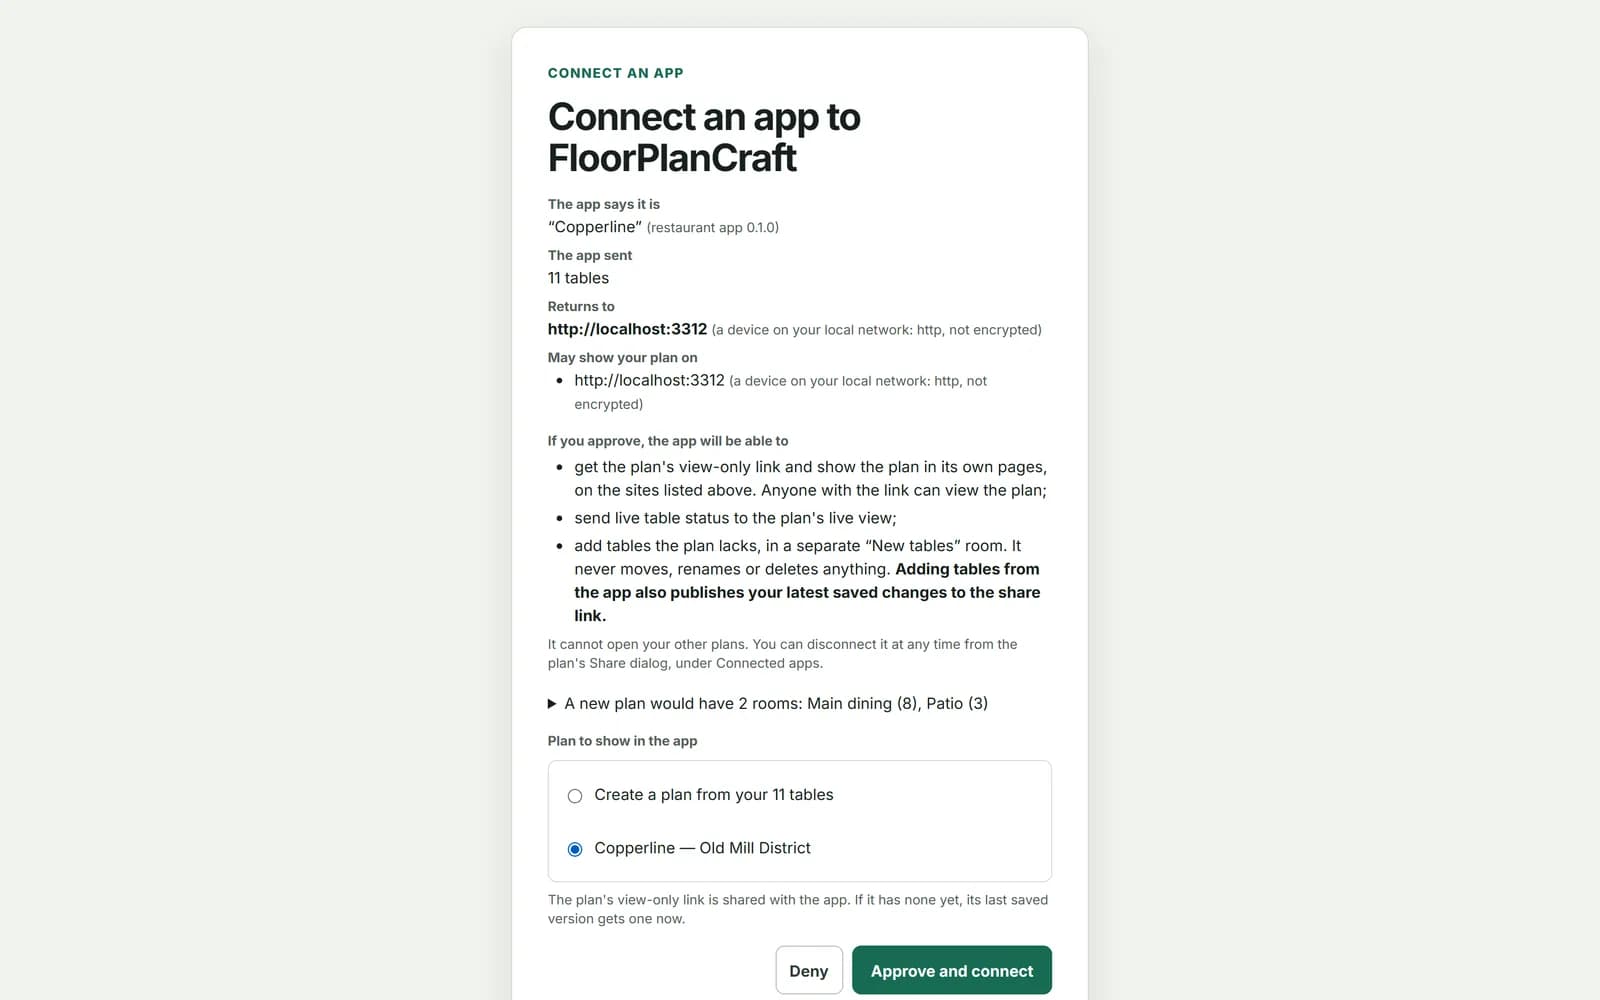
To refuse, press Deny or close the page. A request works once and lasts 10 minutes.
Warning: If the page warns “This will send access to” an address, check that it is your app's address and that you started the connection yourself.
The list holds your saved plans in that workspace that are not archived. The plan's view-only link is shared with the app; if the plan has none yet, its last saved version gets one when you approve.
Once connected, the app can show the plan on its own pages and on the sites listed, and send live status to the plan's live view. A restaurant app can also add tables the plan lacks, in a separate “New tables” room. It never moves, renames or deletes anything, and adding tables also publishes your latest saved changes to the link. The app can't open your other plans.
Make a plan from your tables
A restaurant app that sends its tables can offer Create a plan from your N tables as the plan to show. Approving makes a new draft plan with one zone for each table, named as your app names them, and gives it a view-only link. Open “A new plan would have …” on the page to see its rooms and any plan check notes first. The new plan is a concept layout: open it from your plan library to edit it.
Manage connections in the Share dialog
- Open the plan and press Share.
- Open Connected apps. It appears once the plan has a view-only link.
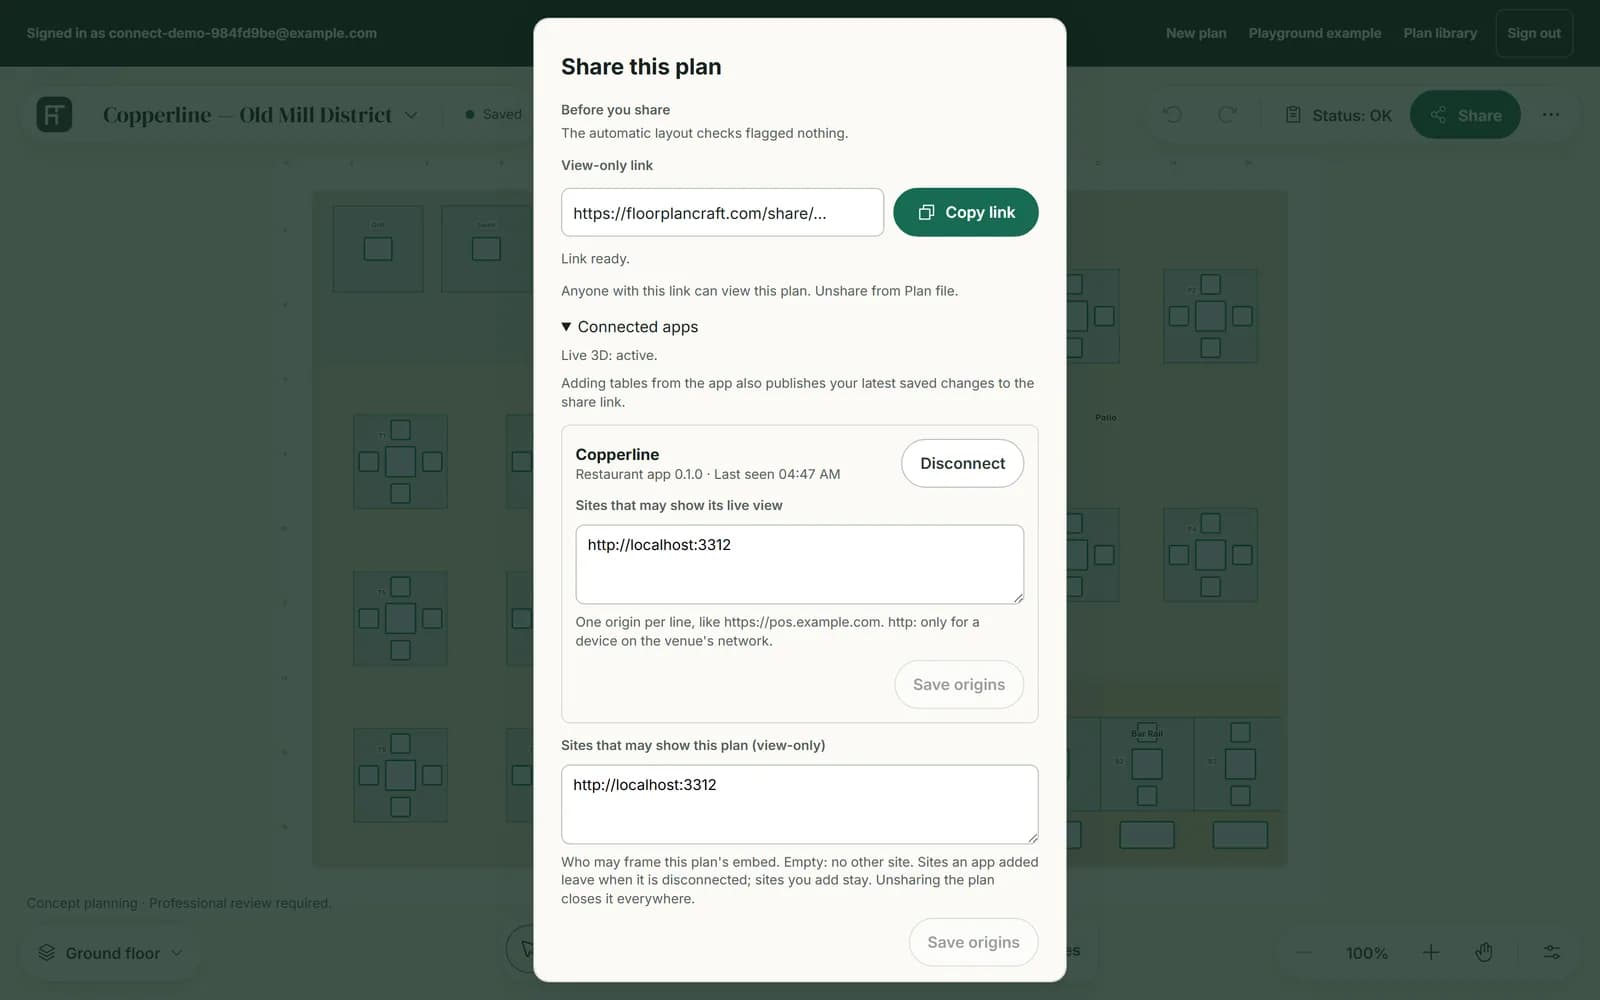
The first line says whether Live 3D is on for your workspace. Then each connection shows the venue's name, the kind of app with its version, and a status:
| Status | What it means |
|---|---|
| Live | The app sent an update in the last 90 seconds. |
| Last seen and a time or a date | The app's last update came then. |
| Not heard from yet | The app is connected, but nothing has arrived. |
| Stopped: the plan was unshared | The plan's link was turned off, so the connection stopped. |
| Disconnected and a date | Someone disconnected the app. |
Choose the sites that may show your plan
Two lists in Connected apps say which websites may show your plan inside their own pages. Enter one site per line, such as https://pos.example.com, and press Save origins.
- Sites that may show its live view belongs to one connection: the sites where that app may show the live view.
- Sites that may show this plan (view-only) covers the plan itself. Empty means no other site may show it. It holds up to 10 sites. Sites an app added leave when the app is disconnected; sites you add stay.
Use addresses that start with https://. An http:// address is only for a device on the venue's own network.
Switch on Live 3D
- In Connected apps, press Switch on Live 3D. The button shows the price.
- On the checkout page, check the workspace. If you have several, choose one under Workspace and press Switch workspace. Then press Continue to payment.
- Pay in the Whop form. If it doesn't load, press Open Whop checkout in a new tab and pay with your FloorPlanCraft email.
- Once the payment goes through, the page switches Live 3D on, usually within a minute. Back to the planner takes you back.
Only a workspace's admin can buy Live 3D for it. While it is active, the checkout page links to your membership on Whop, where you change your card or cancel; canceling keeps Live 3D on until the end of the paid month.
Disconnect an app
- In Connected apps, press Disconnect beside the app.
- Read what will happen, then press Disconnect again, or Keep connected to change your mind.
The app's live view stops within a minute, and the app can't send updates until someone connects it again. Sites the app added to the plan's list are removed; sites you added stay. The plan itself doesn't change. Unsharing the plan stops every connection at once.
Note: Building the app side yourself? Connect an app in the developer guide covers the same flow from the app's end.