Rooms and walls
Place and size rooms, let rooms share walls, join or delete rooms, draw walls that divide a room, and change a wall from its card.
Updated · View as Markdown
Rooms are the building blocks of a plan. Add a room, size it, and place the next one against it so the two share a wall. Use Draw wall to divide a room or to add a wall of its own. All of this happens in the 2D plan.
Add a room
- Press Add room in the tool bar.
- Move the pointer over the plan. The outline of a 4 × 4 m room follows it. It snaps to the grid, or to a free spot when the grid would put it on a wall.
- Click to place the room. The planner goes back to Select with the new room selected.
Where a room can't go, the outline turns red and the notice at the foot of the plan says why. Press Esc or Cancel to stop without placing a room. When the floor already has rooms, the card also offers Divide this room, which switches to Draw wall.
Shared walls
Place a new room against an existing one and the two share one wall. When the outline comes within 0.3 m of a room's wall, it snaps against it and the notice reads “Shares a wall with” and that room's name. A door already in the shared wall then connects the two rooms.
A room can't overlap another room or cross its walls, and it can't block a doorway. The outline turns red and the notice says what to do instead, for example “Room walls overlap. Place the room against the wall to share it, or leave space between rooms.”
A shared wall belongs to both rooms. Its side can't move, and rooms that share a wall can't be moved as a whole: resize their other sides instead.
Resize and move a room
Click a room's floor to select it. Then:
- Drag the floor to move the room.
- Drag one of the eight square handles on its corners and sides to resize it. A greyed-out handle belongs to a side that is part of another wall; point at it to see why it can't move.
- Focus a handle and press the arrow keys to move that side by one grid step, or by 10 mm with Snap to grid off.
- Click the size label next to the room to type exact sizes on its card.
Each change is one undo step: “Room updated. Undo restores the previous room.”
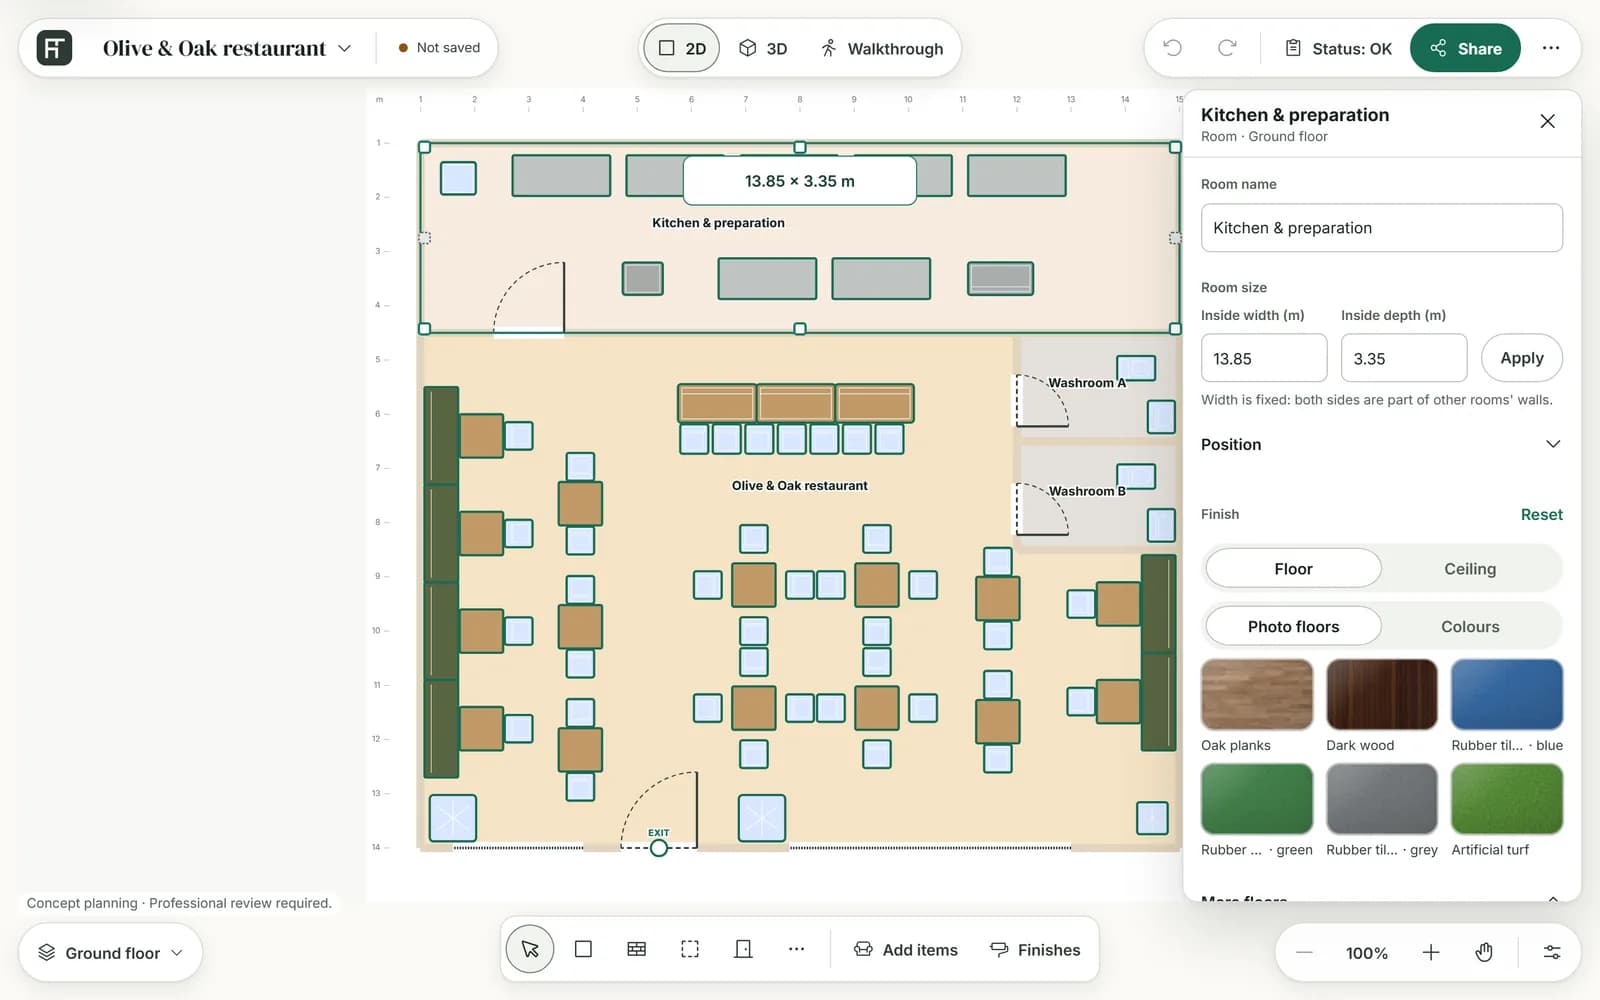
The room card
| Part | What it does |
|---|---|
| Room name | Renames the room. |
| Room size | For a rectangular room: Inside width (m) and Inside depth (m) with Apply, and under Position, Room X (m) and Room Y (m). Sizes run from 0.5 m to 100 m. |
| Finish | The finish of the room's Floor or Ceiling. See Paint walls and change floors. |
| Use as walkthrough start | The walkthrough starts in this room. Press Clear walkthrough start to undo it. See Walk through your plan. |
| Join to … | One button for each side that stands back to back with another room. See below. |
| Delete room | Removes the room and what is in it. |
Join two rooms
When two rooms stand back to back, each with its own wall, the room's card shows Join to and the other room's name. Joining replaces the double wall with one shared wall, and the selected room grows to meet it. The message says by how much, for example “Joined Kitchen to Dining room. Kitchen is now 0.3 m wider inside.”
Delete a room
Delete room removes the room straight away, with its outside walls and their doors and windows, any free-standing walls inside it, and the items inside it. Walls it shares with other rooms stay. The message lists what went, for example “Deleted Kitchen, its door and 3 items. Undo restores them.” If the room held the plan's last exit, it adds “The plan has no exit now.”
There is no confirmation step: press Undo to bring everything back.
Draw a wall
- Press Draw wall in the tool bar.
- Click where the wall starts. The message reads “Start point set. Click the wall end point.”
- Click where the wall ends. The planner goes back to Select with the new wall selected.
Points snap to the grid while Snap to grid is on. A wall from one side of a room to the other divides the room in two, as one undo step, and the message names the new room. If the planner can't tell which side should keep the room's name, finishes and walkthrough start, it asks you to click inside that side; Cancel room split backs out.
The first Esc clears the start point; the second leaves the tool.
The wall card
Click a wall to select it. The card's title says what kind of wall it is, Exterior wall, Interior wall or Partition wall, with the room or rooms it belongs to underneath.
| Part | What it does |
|---|---|
| Finish | Paint, wallpaper or a print, for each face of the wall. See Paint walls and change floors. |
| Add to this wall | Add door or Add window, in the middle of the wall. See Doors, windows and exits. |
| Size and position | Wall thickness, Wall height source (the floor's ceiling, or Custom wall height) and Move wall. |
| A review button | At most one, such as Review room merge or Review deletion. Nothing changes until you apply it in the review. |
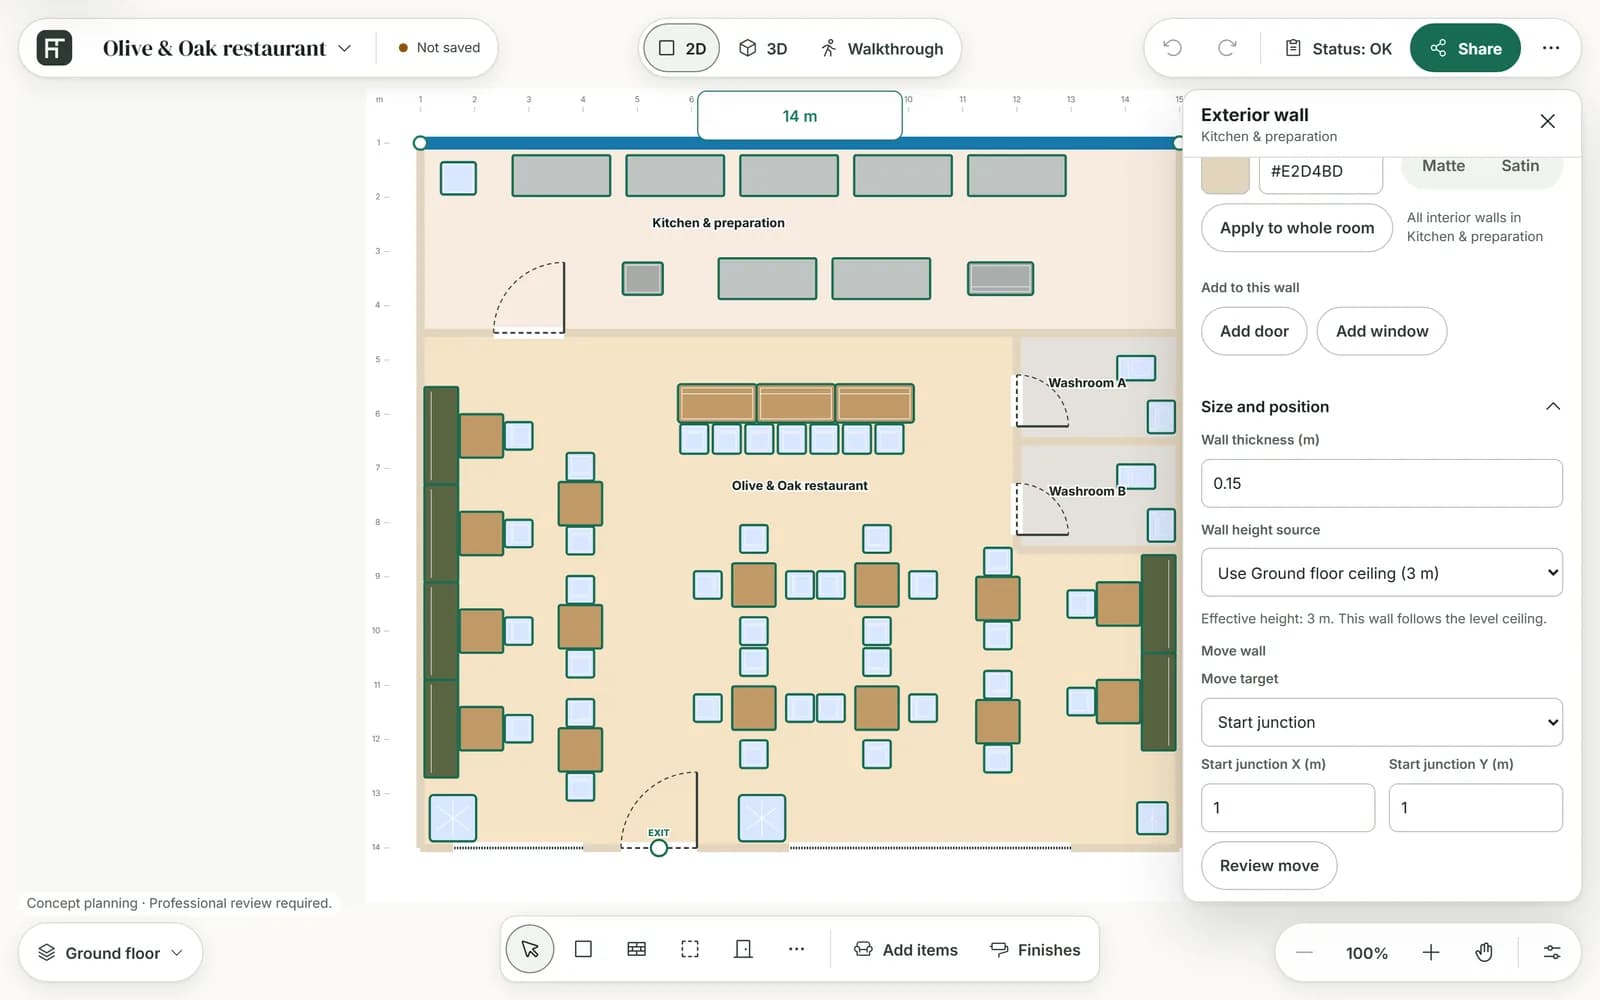
To make a wall longer or shorter, drag the handle at either end, or focus it and use the arrow keys. The label beside it shows the new length, or Cannot resize here.
To move a wall, or one of its ends, to exact coordinates, open Size and position and use Move wall. Choose a Move target (Start junction, End junction or Whole wall), enter the new position or the distance to move, and press Review move. The review lists the walls, doors and rooms affected: press Apply move or Cancel.
Review room merge appears on a wall between two rooms. Applying it removes the wall and makes one room; you choose which room's name and settings carry on, and Undo brings both rooms back.
Note: While a review is open, saving, sharing, exporting, the other views and Undo are unavailable until you apply or cancel it. Esc cancels it.
Identify a room
Walls you draw yourself can close in an area that is not a room yet. Open More tools (⋯), choose Identify room and click inside the closed walls. The area becomes a room you can name on its card. If the area is already a room, the planner selects it instead.